Garden

Tuesday, December 3, 2013

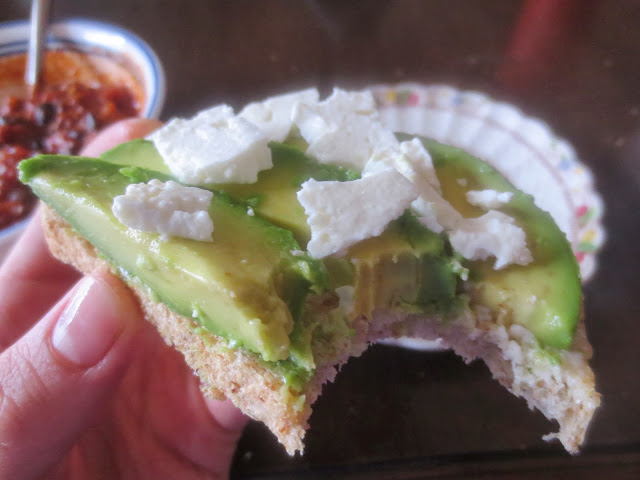
Avocado feta tartine


Toast with mayo, avocado and feta. This little puppy is what changed the way I look at avocado. No longer merely a base for amazing guacamole, I've come to truly appreciate how delicious it is on its own. My husband loves this recipe too. As someone who loves a good word-play, he takes any opportunity to call avocados "lawyers" (in French both words are expressed as "avocats"). Hilarity ensues. 
We do try to eat locally as often as possible, and avocados are one food that pricks at my conscience. If only they grew in our corner of the world... oh avocado why must your carbon-footprint be so large? *sigh* I guess produce this time of year will be grown far away... no matter how you slice it. (hihi)
Avocado is the butter of the fresh produce world - creamy and spreadable, and full of good fat. A friend of mine who lived in Uganda said that she would crave avocados because they ate so few other fats. When my husband and I did a diet cleanse (no processed foods, white flour products or white sugar products) I often found myself hungry at the end of the day -it was probably because I was still nursing my 3-month-old, but regardless I wanted something satisfying. This tartine was my go-to snack and it is still a favourite of mine whenever we have ripe avocados kicking around. 

Note: "Tartine" is the French word for open-faced sandwich and it makes it sound fancy, even though this is just toast with stuff on it.  Think of it as a sandwich with half the carbs.

Avocado feta tartine

Ingredients:
2 pieces of toast (Rice cakes would probably work as a gluten-free option)
1/2 ripe avocado
Real mayonnaise
Crumbled feta

Directions:
First, toast two pieces of bread. (Whole wheat or sprouted bread are good options) 
Then spread a thin layer of mayonnaise. Not Cool Whip! I mean Miracle Whip. None of the Whips should come into contact with your toast, if you can help it. 


Slice half the avocado into about 1/4 inch thick slices.


Crumble about 3-4 tablespoons' worth of feta.


Then scoop the avocado slices out with a knife (or your thumbnail...) and lay on top of your toast. You could squish them with your knife and spread it out like real butter if you felt like it.  Top with crumbled feta.


This goes well with a bowl of soup or chili. I think I see a chili recipe coming soon...


Enjoy!


Friday, November 22, 2013

Pizza roll-ups


Pizza roll-ups. Why didn't I think of this before?? That's what my husband and I both said after eating one and that's what you will say when you try this. I made one the other day as a quick side to go with a soup for lunch (potato leek with lentils) and they are already a favourite. The quality of ingredients go a long way, a dry-cured salami and good cheese make this so much more than folded up Greco.
No offence Greco.
I imagine you could add more ingredients to this recipe, like mushrooms or peppers or any other favourite topping, but it would probably be harder to eat and you'd likely lose more ingredients out the back end of the roll. Messy. But hey it's pizza - feel free to play around and mess up!

Pizza Roll-ups

Ingredients:
Makes 2
2 whole wheat tortilla wraps
4 tbsp prepared tomato sauce
A few ounces of dry-cured salami
Grated cheese to taste

 We get our salami at Costco and it is head and shoulders above any sliced stuff I've tried. It reminds me of the French "saucisson", which I've never found here in SJ. The emmental pictured here is worth trying, but cheddar or mozzarella work too.

Directions:


Lay out two wraps and spread 2 tbsp of sauce on each. You don't want too much or else you roll will slip around and drip as you try to eat it.


Next, slice up the salami and cut into small chunks. Doesn't this stuff look good??
Sprinkle evenly on your sauced-up tortillas. This is where I could picture adding more ingredients...


Grate your cheese and spread it out evenly.


This next step is not pictured but I'm sure you can handle it. Place the tortillas on a cookie sheet and then slide under the broiler for just 1 or 2 minutes until the cheese is melted. Keep a close eye, that broiler is a hot sucker!


Then take them out and slide onto the counter for rolling. Roll them like... well like you would roll anything. Eat them while standing at the counter because they're just so good. Alternatively you can sit down and have them with another side dish such as salad or soup. Enjoy!


My husband loved this so much he tried coming up with exciting names like Pizza Bomb, but I thought that sounded too messy.


You can also slice the pizza roll-up into inch-thick rounds. We call this one Pizzushi. 

Wednesday, November 20, 2013

Everything salad


This is one of my favourite go-to lunches. It's big, it's beautiful and as delicious as it is filling. I make it with whatever I have in the fridge, everything but the kitchen sink, as they say, so it ends up being different every time. Throw together some greens, veggies, a protein, herbs and dress this baby up in your favourite salad dressing and dig in! I try to include some kind of protein or else I end up feeling hungry no matter how many lovely veggies are in it. You can pick and choose the ingredients you want and make a new version any day based on what is in your fridge. The beauty of this salad is that it's hard to go wrong and it's so quick! Fresh herbs aren't always easy to find but the amazing flavour makes them well worth another trip around the produce section.

Today's salad featured spinach, tomatoes, cucumber, pickles, feta, chickpeas and parsley with my balsamic vinaigrette. So good.

*Note* To all you moms out there, for Sophie I slice up extra veggies and cheese, add some toast or wrap to make a nice picnic lunch. No need to make a separate meal!

Everything Salad

Ingredients: (choose one of each of the following categories for a nicely balanced salad)
I've included approximate quantities for one large portion of salad - multiply accordingly!

Greens - 2 handfuls
Any lettuce torn up, baby greens or baby spinach


Veggies - 1 to 1 1/12 cup 
Any combination of the following
- tomatoes
- cucumbers
- peppers
- pickles
- mushrooms
- grated carrot
- grated zucchini


Protein - 1/4 to 1/2 cup  
Choose one or combine two (bacon and eggs! hehe)
- chicken
- bacon
- tuna
- chickpeas
- hardboiled eggs
- feta
- quinoa
- nuts (walnuts, peanuts, almonds)
- seeds (pumpkin, sunflower, sesame)


Herbs - 2 tbsp
Optional for when you can find them
- basil
- parsley
- mint
- oregano


Vinaigrette - 2 tbsp
Use storebought or make your own

Thursday, November 7, 2013

Bailey's Pots de Crème

It's the dessert you've all been waiting for. It is the most creamily decadent chocolate dessert to ever grace your taste buds, and it is mind-numbingly easy. You make it in a blender for goodness' sake. I first heard of this type of dessert over at Pioneer Woman, and have made it dozens of times with success each time. I make it often enough that I have memorized the recipe. It's that good. If we have last-minute guests coming over, I throw this in the blender, pop it in the fridge for a couple of hours and voilà, a dessert worthy of the fanciest tables in the fanciest restaurants in, like, Paris or something. I've adapted Pioneer Woman's recipe a bit, substituted hot chocolate for the hot coffee and settled on Bailey's as my liqueur of choice. Honey whiskey is a flavour well worth trying though. 

Bailey's Pots de Crème

Ingredients:
Makes 4 generous portions, and doubles easily if you have a crowd coming over.

3/4 cups semi-sweet chocolate chips
2 eggs
1/2 tbsp Bailey's liqueur
pinch of salt

1/2 cup boiling water
1 heaping tbsp hot chocolate powder

Directions: 
Start your kettle boiling to have the water ready for a few minutes from now. Throw the chocolate chips, eggs, Bailey's and salt into the blender and blend well. 


Blend it real well. 


Mix together the hot chocolate powder with the just-boiled water. You want it to be really hot! When the mixture in the blender is as smooth as it will go, while it's still blending take the little round thing out of the top of the blender and slowly pour in the super hot chocolate.


The mixture will emulsify, slightly cooking the egg and giving the chocolate an amazingly smooth texture much like ganache. It's essentially chocolate mousse without the whipped cream. Delicious


Pour individual portions in ramekins or any other dish of your choice (check out Pioneer Woman, linked above, she had some good ideas). Sometimes I just pour it into a big dish for scooping or dipping things into. Refrigerate for at least 3-4 hours until firm, then serve with whipped cream.


My husband wanted me to take this picture and give it this caption - "This is what your bowl will look like 8 seconds after take your first bite."


For an even more decadent dessert (because that's what we all want) take those mini cream puffs from Costco and top with the chocolate stuff and whipped cream if you like. I think this may just be my favourite dessert of all time. I kid you not.


Oh good Lord. This honestly tastes like Heaven. Easiest make-ahead dessert you will ever make, and everyone will ask you for the recipe. :)

Thursday, October 31, 2013

Ratatouille

Show of hands, who thought of the Pixar movie of the rat who cooks haute cuisine when you saw the word ratatouille? I had heard of ratatouille (the dish) but it wasn't until I saw Ratatouille (the movie) that I decided I wanted to try cooking it. I love the scene *spoiler alert* where Rémi (the rat) cooks simple ratatouille for the picky food critic who has it out for the restaurant, wins him over and saves everything. Except the restaurant. But don't worry it ends well... you'll just have to watch it if you haven't yet. 

Anyway, ratatouille (the dish) is the focus of this post because I've discovered a new staple in our menu rotation. It is a traditional dish from Provence in the south of France, meant to be made with the bounty of the summer garden. I've made it a couple times recently and it such a good dish, healthy because it's full of vegetables and delicious because it's full of vegetables... and olive oil. And garlic. It's simple, slow-cooked so all the flavours meld into a summery stew of deliciousness. I found a ratatouille recipe in my trusty Joy of Cooking cookbook, and adapted it a bit. Everyone should have a Joy of Cooking. I found mine at Value Village 10 years ago when I was moving away from home, and I still use it regularly. It's covered in duct tape and stains and is definitely well-loved. Let's move on...

Ratatouille

For this recipe the quality of the dish is directly related to the freshness and flavour of the ingredients - no hothouse hydrotomatoes here! Get them vine-ripened, or as close to the garden as you can get. 

Ingredients: 
1 large eggplant (aubergine in French - such a nicer word!)
1/4 cup olive oil
1 small onion, chopped
2 cloves garlic, chopped
3-4 large ripe tomatoes, diced
2 bell peppers (colour of your choice), diced
2-3 small zucchinis, diced
1/2 tsp dried oregano or small handful of fresh basil
Salt and pepper to taste

Directions:
Prep and cooking time - 1 hr 15 minutes
First, slice the eggplant into 1/4-inch thick slices and lay on a cloth or paper towel. Salt them well and let them sit 5-10 minutes to get rid of the excess moisture. 


While they are sitting there waiting to be dabbed, heat the olive oil in a heavy pot and sauté the onions and garlic until golden. I always throw in the onions first and wait until they soften before adding the garlic - that way the garlic doesn't burn.


Look at these beauties. The last of my garden tomatoes. I have enjoyed them so much this summer. My dears, you will be missed this winter as I navigate the murky waters of hydroponically grown tomatoes from Mexico...


Dice everything up nice and dicey. When the garlic and onions are golden brown, add the rest of the ingredients (including drained and diced eggplant) to the pot and stir well, adding another glug of olive oil for good measure.


Cook covered over low heat for 45 minutes, stirring occasionally. Remove the lid and continue cooking for 15 minutes to evaporate some of the liquid. Salt and pepper to taste.


It makes a delicious/super healthy meal with quinoa (or rice) topped with grilled salmon. *Drool*

Wednesday, October 16, 2013

Chocolate Loveberries


 *Disclaimer* I know the picture looks like a messy bowl of chocolate covered mystery-lumps, but trust me. It's worth it. 

~~~~~~~~~~~~~~~~~~~~~~~~~~~~~~~~~~~~~~~~~~~~~~~~~~~~~~~~~~~~~~~~~~~~

My husband and I have been doing our annual liver-cleanse diet of no sugar, no processed food, no refined white products (flour, pasta...), no red meat, no alcohol, no recreational drugs (that one was really difficult.. j/k :) ... we feel great when we do it, we have lots of energy and sleep better, and it resets many of our eating habits. It is also a lot of work and I have to skip many of our meal short cuts like pasta and frozen pizza, make meal plans and think ahead - which is harder than it sounds! The really difficult part is no dessert because we both love sweets. And I love to make/bake sweets! I managed to find a couple recipes that satisfied our sweet craving while staying within our diet parameters. My secret weapon: maple syrup. Delicious unrefined sweetness, and you just need a little bit!  Honey works too, but I love me some maple. I came up with this recipe one night when we were craving ice cream. It's just a simple recipe of chocolate whipped cream folded with frozen berries. The berries freeze the cream and the berries thaw just enough to make the flavour really pop. Jamie came up with the name because he knew I made it out of love for a man who loves his chocolate (and was temporarily deprived of it...). We love it with blueberries and raspberries, but I'm sure it would be delish with chopped strawberries, blackberries, maybe even frozen peaches! Feel free to try any combination thereof.

Ingredients: (makes two portions)
Chocolate whipped cream
1/3 cup whipping cream
2 tsp of maple syrup
1 heaping tsp cocoa powder

1 1/2 cup frozen fruit, divided in two bowls.

Directions: 
Whip the cream with cocoa and maple syrup. I just do it by hand with a whisk, it takes just a couple minutes and you get a great wrist workout. The great whisk wrist workout I call it.


Portion out the frozen berries into two bowls. You can let them thaw a little if you like a softer, 
less frozen bite. 


                                   Top with 1/2 of the chocolate cream in each bowl. 


Fold it all together, let it sit a few minutes to get that nice frozen texture, and enjoy!


Monday, August 26, 2013

Black bean and corn quesadillas


On July 3rd we welcomed our second daughter, Fiona Marie, into our family. It has been an amazing, challenging, joy-filled, sleep-deprived 8 weeks and we wouldn't trade it for the world. However, let's just say I haven't been cooking much... salads, wraps and BBQ have been our go-to meals.  Wonderful friends of ours came over with their two kids in the midst of new baby craze-haze, and they brought the ingredients for black bean quesadillas. Not only was it a huge blessing, but we loved it so much that we added it to our regular menu rotation! They are easy, healthy, and most importantly; delicious. I have yet to convince our almost two-year-old that black bean paste is not evil... she eats a deconstructed quesadilla - a "deconstradilla" I call it - without the beans. 

Ingredients:
4 wraps
Black bean paste - about 1/2 can (recipe below)
1 bell pepper (colour of your choice - red is prettiest)
1/2 cup corn (fresh or thawed)
Cheddar cheese
Salsa
Sour cream or plain yogurt

~~~~~~~~~~~~~~~~~~~~~~~~~~~~~~~~~~~~~~~~~~~~~~~~~~~~~~~~~~~~~~~~~~~~~

Black bean paste recipe  
(Feel free to double the recipe and use a whole can of beans. 
The paste will keep about a week, or you can freeze it)
Ingredients
1 tbsp olive oil
1/2 onion, chopped
1/2 can black beans, with liquid
1 tsp cumin
1 tbsp chili powder
1/2 tsp pepper
Salt to taste

Directions
Heat oil in small pot or skillet. Fry onions until soft and golden, add the spices and beans and cook for 5 minutes. Mash with a potato masher, or if you like a smoother texture use a food processor (just be careful, it's pretty hot) 
Voilà!

~~~~~~~~~~~~~~~~~~~~~~~~~~~~~~~~~~~~~~~~~~~~~~~~~~~~~~~~~~~~~~~~~~~~~

Directions for quesadillas
Spread some black bean paste on half of the wrap, sprinkle with corn, chopped peppers and cheese.


Fold in half and place in pan to heat up until cheese is melted and the wrap is golden. 


Serve with salsa! (and sour cream or plain yogurt if you have it) 


I can see including avocado or sliced tomato in a variation of these. And I bet guacamole would be great on top! Maybe next time...